Jun 16, 2010

To DIY or not to DIY: Flowers

As those who know me can attest, I like to be in control of things. Wedding planning is no exception. In fact, not only is wedding planning no exception, it seems to be taking my desire for control and honing it into a fine-edged point. The point being: "I can totally do that myself."

See, you combine a party (which I very much enjoy) with crafts (which I live for!) and Brenna is a happy camper. And add one dash of hard cash and a cold splash of "they want how much for that?!" and thus is born the DIY bride. Do It Yourself.

So far my project list includes: Bridesmaids cards, Save-the-dates (done and done), invitations, website (in progress), programs, aisle runner, favors, ring bearer pillow, table numbers, centerpieces, napkin rings, bouquets, boutonnieres, faux-to booth, Kid Zone, accessories, etc.

Did I mention that the wedding is in less than four months now?

Most of the projects I decided to DIY fall pretty comfortably within my skill set. You'll notice there is no baking/cooking or seamstressing listed. The one thing that set my mom to sniggering was the thought of me doing my own flowers. The conversation went something like this:

Me: I'm going to do my own flowers
Mom: ::snort::


And, truthfully, I am a bit nervous about floral arrangement. I feel like when I buy a bouquet from the store and try to stick it in a vase at home, it always ends up looking wonky and lopsided. I've always blamed the vases, but maybe it is me... Hmm...

But I reasoned, hand tied bouquets don't look that hard:
For this, you'd just take roses, some leaves on the outside and wrap it up, right? No vase to throw things off, and no other filler to poke out at weird angles.

Or this one:Just tightly bunch together some carnations (which, despite Charlotte's disdain, I think are quite lovely) and voila! Bouquet!

So, I am bravely venturing forth to do my own flowers.

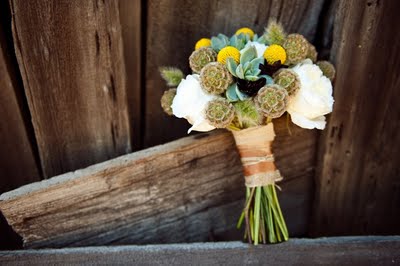
Of course, I'm now being drawn to hand-tied bouquets more along these lines:

All of which look deliciously complicated, but make me feel all warm and smile-y.

And, all of the bouquets above feature my new obsession: The Chocolate Cosmo. This is a flower that is brown, which I heart (and fits in my color scheme) but more importantly: the flowers smell like chocolate.

Did you get that?

The flowers. Smell. Like. CHOCOLATE.

How have these flowers not become more mainstream? And why are there not ten bushes of them growing in my back yard?

I totally got side tracked there, thinking about my chocolate cosmos. I have yet to meet these beauties in real life, but I have no doubt that they will enter my life some day.

Back to topic: DIY flowers. Hand tied bouquets: I can totally do that. And I wasn't too worried about centerpieces, since I'm going heavy on candles, light on flowers.

Theeeen, I realized that the bride isn't the only person who gets flowers. In fact, it isn't even only girls that get flowers. The guys are supposed to sport flowers as well, in the form of the boutonniere.

Oh. Boutonniere. Not only is it ridiculously hard to spell (seriously, close your eyes and try), they don't strike me as the easiest thing to just whip up.

I read some instructions online, but kept getting lost at the "insert the wire and form a hair pin" part. Insert what wire? Where? Is it supposed to go in my hair?

Luckily, some lovely Sacramento wedding vendors got together last weekend to host a "Recessionista" Bridal Show/Workship, which included instructions on how to make a boutonniere! Huzzah!

Bono was kind enough to have back surgery, thus opening up my weekend (trying to put a positive spin on missing U2 in Denver), so I signed up and happily attended the workshop.

I'll put aside the fact that most of the people leading 'DIY workshops' spent their time telling us that most wedding things are best left to the professionals, i.e. them. I didn't care about the cake/DJ/make-up lady because the florist was phenomenal!! Her name is Angie Zimmerman and she actually publishes a DIY flower guide. She has figured out the DIY brides are not going away, and has gotten smart! And she was very helpful to me, and answered all my flower (and chocolate cosmo) related questions.

And then, she showed us how to make boutonnieres!!! Yay!!

And after I learned that Santa Rosa has a wholesale flower mart I couldn't help but stop there this morning on my way home from work.

And now, let me present my first attempts at boutonnieres (which I STILL cannot spell without spellcheck):
Freesia, hypericum berries and yellow pompoms with wrapped stems

Greeen pompoms, hypericum berries with wrapped stems

Just hypericum berries with natural stems. Maybe more of a corsage, given its largeness.

Unopened freesia and small green pompoms with natural stems.

Hypericum berries, unopened freesia and small green pompoms with natural stems.

What do you think? Would you use any of these? Which ones? And, most importantly of all: who wants to help me make the real ones? Anyone?? :)

Apr 30, 2010

STD: Go Go Gocco, Part 2 and Leaving Home

When we last left off, I'd created my template for the Gocco, gathered all my supplies, and was ready to get started!

The first step is burning the screen. I felt fairly confident after all of my preparation, but I was still nervous about doing this for real.

After seeing this burned screen, though, I thought I was in like Flint!

I cut out and placed the ink separating boundary thing-a-ma-bob. One nice thing about the Gocco is that you can print with multiple colors at the same time.

Oooh! Look at the pretty inked screen! I couldn't wait to see what it looked like printed out. I decided (again following advice of those who'd gone before me) to do a practice print first.

::Insert game show loser song - wah-waaaahhh:: Failure!

That was not only anti-climactic, it was terribly disappointing.

Luckily, I was able to develop a working theory as to what went wrong. The template has to contain carbon for the heat-sensitive image process thingy to work. That means it has to be a photocopy. But if it is too carbony, the fibers stick to the screen. The solution is simple:

Iron the template! I don't know what it does, I just know it was supposed to work. So, I ironed a second template copy I had made, and burned a new screen.

And it worked!!!

The final result!

Now, this certainly was not even close to perfect. It wasn't even really what I wanted it to look like. See how the "Beautiful" and "Lake Tahoe" are all faded at the edges? And the arrow after "Reno?" And the tree? And the blue lake is all square-y? I think this has something to do with me making the template too big, and the lake too solid. I ended up being happy with the way the letters were faded, though - it really gave it a vintage feel. The square-y lake I decided to just ignore. Or pretend that the texture made it look like waves on the lake.

The only thing that I wish I had done differently was the colors. I think I used too much ink, so the colors ended up bleeding into each other, especially in the later ones I made. What was done, was done, though, and I picked out the ones that looked least crazy to send. And, of course, I used a corner rounder to round the corners, cause I'm like that.

I used a removable glue dot to stick the magnet to the card. I like the way the magnet and the card look together. It's like we're standing on the shore of Lake Tahoe.


Finally, I got some generic envelopes at Michael's (40% off!) and some address labels at Goodwill ($0.99!) and some "Celebrate!" stamps at the post office (no discount there).

Here they are, all grown up and ready to go out in the world:

Total cost break down:
Magnets $0.24 each = $19.20
Copies for Gocco template $0.98
Envelopes $0.12 each = $9.60
Card stock (1 pound stack from Joann's Fabric, 40% off) $2.39
Glue dots $2.00 worth of box used
Mailing Labels $.50 used
Postage $0.44 each = $35.20
For 80 total STDs made = $69.87
or $0.87 per STD!

Of course, if I add the cost of the Gocco (I used less than half the screens, bulbs and ink that came with my original purchase) the cost goes up to $2.41 a piece... But I plan on using the Gocco for other things, too, so I'm not counting that!

Apr 29, 2010

Thing #639 That I Don't Need

Aisle Runners! What are aisle runners, you ask? Ahh, I remember when I didn't know about things like aisle runners or Chivari chairs or chargers... ::staring off into space, remembering life before fiance-dom:: But, back to topic. Aisle runners are like long carpets laid down in the aisle (aha!) for the bride to walk on. Presumably because the bride can't tread the same ground as the proletariat. Or she can't let that $10,000 gown actually touch the ground while she walks to meet her groom!

So, yeah. Aisle runner. Not for me.

Theeeen, I saw videos of aisle runners actually being rolled out by groomsmen. Here is a somewhat facetious example:


And a tiny part of my heart sort of fell in love with the idea. That is the part of my heart that I affectionately call "Crazy Bride Girl" and she's a little... well, crazy. And, all of a sudden, aisle runners moved from my "that is so silly and unnecessary" list to the "I have to have it" list.

So, a quick search on my favorite store of all time: Google, I found that aisle runners can range from simple:Price $44.75

to a bit classier:
Price $41.75

From silk-screened images:Price $180-275

To hand painted monograms:Price $75-200+

And everything in between.

The things all of these aisle runners have in common is this: they don't fit in my budget. This moved aisle runners on to the "Maybe I'll figure out a less expensive alternative" list (this list is long).

And, I am happy to say, I crossed that item of the list today! Maybe.

Another of my frequent trips to Goodwill scored me a partial bolt of "Ivory Baroque Satin" aka "100% acetate" but I'm not dithering over fabric quality at this point. Cause, dude! It's to walk on!

It's folded in half here, so is twice as wide, and shinier.

I have no idea if I'll end up using it, but at $6.99, I couldn't pass it up. I like that I could do whatever I want to it - splatter paint, tie dye, trace crime scene bodies... the possibilities are endless!

When I see videos like this I think maybe the aisle runner is not all its cracked up to be:

But then I think it is really funny, and would make me laugh, and who doesn't love laughing at weddings?

Do you think I should use the aisle runner? How should I decorate it?

Apr 27, 2010

I'll See You in Pictures: A Tale of Umbrellas and Balloons

Yesterday was a day I'd been waiting for for a long time - our engagement pictures! We were initially supposed to do them a few weeks ago, but a dasterdly spring storm thwarted our plans.

As cool as pictures in the rain with cute umbrellas and galoshes can look:
Photo by Catherine Hall
Photo by Charlotte Leonard

And, as fun as splashing in puddles in the rain can be:
Photo by Clayton Austin

I was concerned, because:
1. I don't own a cute umbrella or galoshes
2. I didn't want to end up looking like this:


So, yeah, we rescheduled. And yesterday the rain held off long enough for us to get in a couple of hours of pictures!

It wasn't until yesterday morning that I finally picked my outfits. I brought the original inspiration outfit, a casual outfit with jeans, T-shirt and jacket, and another dress/sweater combo I recently got. And bright yellow sandals, because how fun are bright yellow sandals??

My two dresses. Sorry for the poor-quality photo. I was running late, and didn't have time to pose them nicely! I was already wearing the jeans outfit, so it isn't pictured.

I was running late getting ready, because I spent over an hour in the early afternoon traipsing around party stores in Sacramento looking for the perfect balloon! I had decided that I wanted a big, round balloon. Yes, I happily hopped right aboard the balloon e-pic band wagon.

Fun!!

I finally found the big, round balloons at Party Concierge in Sacramento. Unfortunately, big round balloons are not only HUGE (like won't fit in my car huge) they also cost $25. Hmm. I chose the 24" balloon-shaped balloon instead, for $7.61, a much more appropriate prop-price in my mind. And still so big it barely fit through the door of the car!

We used a couple of the spots I'd picked out in my scouting mission. I was glad I'd taken the time to do that, as the location was a new one for our photographer, and he hadn't had time to scout the area very thoroughly himself.

Having your picture taking can get kind of exhausting. And, let me tell you: it is hard to make jumping in the air while holding a balloon look pretty. Or natural. Gives me a whole new respect for the models of America's Next Top Model. Is it just me, or do they seem to be jumping a lot this season?

In the end, I didn't change into my fun 40s outfit, because I was tired, we were running out of light, and I kind of decided it wasn't the right outfit for the setting. I now picture it in a big city setting, or a cafe, etc. Anyone want to volunteer to take e-pics of me and Marc in the city one day? I'll totally rock the outfit then.

We should get to see the actual pictures some time next week. Until then, here's one last parting shot of us post-pics getting some dinner. We brought our own flowers to dinner last night, from our garden. It was supposed to be another prop, but we forgot about it!
I think my make up held up pretty well, which I'm happy to see. I'm not sure whether to hire someone to do my wedding day make-up or not. And Marc was thrilled to both long hair and beard for the shoot. Not to mention the hat!

Apr 22, 2010

STD: Go Go Gocco, Part 1

Definition
Gocco

Pronunciation: \ˈgō\-\kō
Usage: noun
1: aka "Print Gocco" is a self-contained compact color printing system invented in 1977 by Noboru Hayama, uses a heat sensitive copying method for preparing silk screening style stencils. Production of these ceased in about 2005
2: derived from the Japanese word gokko, loosely translated as make-believe play
3: an item that has become hugely popular with independent artists and brides-to-be as a way to create very cool screen-printed art
4: another project I had to do as soon as I heard of it

I first came across info on the Print Gocco when I started looking at wedding invitations. This may or may not have been before I got engaged. Which may have led me to buy a Gocco on eBay within a week of so of getting engaged... What can I say? I was excited!

I got my Gocco in the mail in January. My initial plan was to use it only for the invitations, so while I was freakishly excited to have the Gocco in my possession, I didn't intend to actually use it for many months.

Then, after I'd settled on using magnets for our STDs, I realized that I couldn't just stick a magnet in an envelope and send it. Poor lonely magnets! I'd need something to attach the magnet to, to put it in the envelope. The cogs in my brain turned away, and then, Bingo! The Gocco!

Thus began the Design a Template project. I came up with about five hundred million designs from simple to elaborate, monochromatic to layers upon layers of color. I'd scratch design ideas on any little piece of paper that was in my possession for any period of time. Finally, I settled on one inspiration:

The Vintage Lake Tahoe postcard! It fit perfectly into what is slowly becoming a vintage-inspired wedding (more about that in the future!)

After I had a good inspiration, the actual design came pretty easily. I downloaded a free trial of a map making program, downloaded some new fonts (I don't have these details on hand as I'm at my parents house right now, and that info is on my computer at home - sorry!), and some clip art, and went to town.

Then came the hours and hours of research on how to use the Gocco. Most bloggers that have written about it express at least a mild level of frustration. I was nervous, but determined.

Finally, after three months of preparation, I was ready to actually give it a shot. My MOH was in town for a race we were running, and that seemed the perfect time to Go Go Gocco!

It started with one last look through the Gocco tips I'd compiled.

I gathered the needed supplies:

Inks

The plastic body part, the screens, the blue filter.

The flash bulb housing, flash bulbs and wine (for fortitude).

Batteries.

The sister/MOH with a good sense of humor.

And, finally, the template

Coming up: the first Gocco Fail!

Apr 20, 2010

STD: The Magnets

I am certainly not the first bride to take advantage of the appliance that features prominently in most kitchens in the United States. I am, of course, referring to the Holder of Yummy-Goodness; The Protector from Ravaging Bacteria: the Refrigerator. More specifically, I am taking advantage of the magnetic property of the refrigerator.

After a quick Google lesson, I feel that I can now teach you a little about magnets. Because I know you're very curious!

Apparently the details are debated, but the story I like the best regarding the original discovery of magnets is this: A Greek dude named Magnes was herding his sheep in Magnesia. Much as I only herd sheep in Brenna this guy apparently didn't stray too far from home. One day, he was walking around in his fancy iron-nail-heeled sandals and iron-tipped walking staff when he got stuck to a big rock! He called it Magnetite. Either after himself, or his country, or maybe just for the heck of it.

Fast forward 4000 years or so, to the ingenious William Zimmerman in the 1970s. He was standing at his fridge one day, realizing that there was no food since his wife was in Chicago visiting her sister. She had to leave suddenly, and the note she'd left on the counter had gotten coffee spilled on it when he had dropped his Greek history book that morning. As he searched around for a Chinese delivery menu, he wished there was a place to put things like notes and menus where they'd be easily accessible and not likely to be spilled on. Then the light bulb went off - and not the one in the refrigerator! He set out to find a way to use Magnes' ancient discovery to bring convenience and decoration into his kitchen, and successfully filed the first US Patent for a refrigerator magnet.

I might have made that last bit up, but wikipedia does say good ol' Billy Z filed the first patent for the refrigerator magnet, and who am I to disagree with Wikipedia?

Fast forward 40 more years, to my living room, where I am deciding to join the ranks of brides who combine the works of Magnes and Zimmerman to create our own magnets for the viewing pleasure and convenience of our guests.

Aaaand, another 15 minutes from there, fast forward to me refusing to pay a dollar a piece for a stinking little magnetic doo-dad that most people probably won't use anyway.

After a bit of internet leg-work (is that an oxymoron?), I was able to assemble the pieces to make my own magnets for far less than that.

1. The picture. I decided that I really liked this picture that we took of ourselves a couple of days after getting engaged. It is in Seaside, Oregon. This was the best picture of the sunset we got that day. It was rainy!After choosing this image, I used my favorite go-to photo editing site: Picnik It was around Valentine's Day, so they had some fun heart stuff to play with, and I cropped, and played with colors, and added some words, and came up with this:
Pretty!

2. The business cards. I took this image to my favorite go-to site for random junk with my name/address on it: Vista Print. There, I ordered 250 business cards with just the image printed on them. With all their random discounts, they ended up costing $6.48 total. I ordered some other stuff, including a return address stamp for our envelopes, so the shipping was free. Yay!


3. The magnets. Without this, my whole plan may have fallen to pieces. But! My favorite go to site for all around random junk came to the rescue! Oriental Trading Company had these adhesive magnetic sheets. Perfect! They cost $14.98 for twelve 8.5x11" sheets including shipping.

4. The work. Armed with all of my supplies, I set to work.
You may have noticed the black borders on the side of the business cards. Yeah, I miscalculated the size a bit, so I had to cut all of those off first. That was fun. Then I stuck the cards to the magnet sheets. I actually fit 13 cards per sheet, there are just 10 in this shot. Easy peasy!

Then, because I wanted them to be shiny (and because I really like making more work for myself) I shellacked the heck out of them with Mod Podge.

Drying!

Then I had to cut out all the magnets individually from the magnet sheets. And, to add just one more layer of complicated-ness, I used my corner puncher to punch all the corners. But see how shiny and not cornered-y they are?! I love them. I had 48 of them on my fridge for a few weeks even.

Cost breakdown:
Business cards (80ish used) $2.40
Magnet sheets (6 used) $7.50
Mod Podge (with Michael's coupon) $3.59
Corner puncher $4.99
Total: $18.48
Price per magnet: $0.24!

That's more than a 75% savings from what I found for premade ones! Granted, I put many hours into this, but it was a great excuse to watch TV and drink wine, and I had fun!

I know many or even most people won't use them, but even if only a few people have them stuck to their fridges now, I'm happy.

And I think Magnes and Billy Z are happy, too, where ever they are...

Apr 19, 2010

STD: A Preview

Definition
STD (abbreviation): Save the Date (not the other STD!)

Pronunciation: \ˈsāv\ thə \ˈdāt\
Usage: noun
1: an item stating the date of a wedding or other formal event. It typically states the date when a couple plans to marry, so that recipients will know to keep that date free. Save the dates usually take the form of a card, but can also be a refrigerator magnet or similar item. They are generally sent out at least six to twelve months before the wedding date, and are usually followed by a formal wedding invitation.
2: the first project sent out to future guests that can set the theme for the whole wedding
3: a project I had a lot of fun making!

I (finally) sent (most of) them out last week! Yippee! And I know that a few people have gotten them, so now I can post about it here. I'll go into details about how/what, but here are a few teaser shots.

The Envelopes:


The Magnets:


The Cards:


The Mess:


With postage and all, I estimate that I paid less than $1 per STD. I haven't done to exact cost break down, but I will when I show you more details about how I made everything!